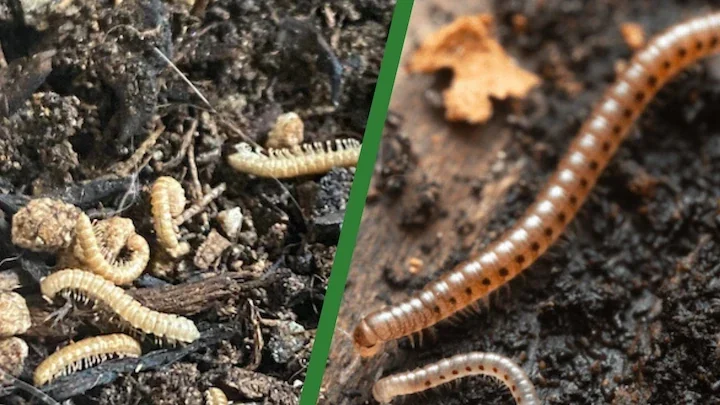
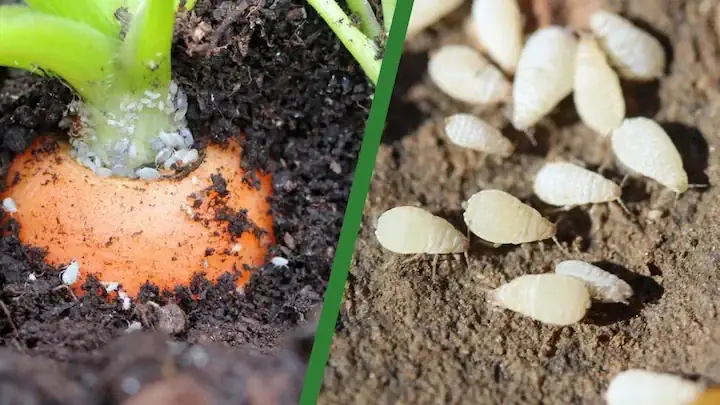
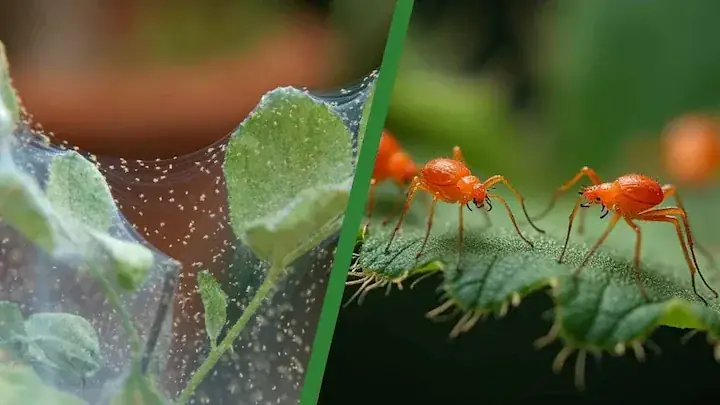
Why are there worm-like bugs in my soil is often a millipede or centipede issue, especially in damp areas with lots of debris. Millipedes can nibble tender seedlings, while centipedes are mostly predators of other pests. Moisture and habitat cleanup are usually the most effective fixes.
Why Are There Worm-Like Bugs in My Soil? Millipedes and Centipedes Explained

Quick Diagnosis
Why are there worm-like bugs in my soil: quick diagnosis
Short answer
Most cases are moisture-and-habitat driven crawler activity near soil level. First step: Inspect at dusk or night with a flashlight and identify body shape and movement speed.
Most likely causes
- Damp habitat buildup: mulch, litter, and wet debris collect around plant bases
- Chronic surface moisture: pot areas stay wet and cool for long periods
- Weather-driven migration: numbers surge after rain or abrupt dry spells
- Seedling vulnerability: damage is mostly on tender young plants
What to do first
- Dry and clean the zone: Cut back overwatering and remove wet litter, mulch clumps, and debris near crowns and pots
- Remove shelter points: Lift and clean under trays, boards, and dense cover where crawlers hide during the day
- Manual nighttime removal: Collect visible crawlers at dusk or dawn when they are active and easiest to find
- Set basic traps: Use damp cardboard or boards overnight, then discard trapped pests each morning
What not to do yet
- Do not spray before checking hidden leaf undersides, stems, and soil-line areas
- Do not stop after one cleanup if eggs or hidden stages may still be present
- Do not treat nearby plants blindly, but inspect them before pests spread
Quick answer
Quick answer: Millipedes or centipedes around moist soil habitats. These crawlers usually indicate damp shelter zones; cleanup and dry-down are the core fixes.
- Early sign: You see many-legged pests around pots, trays, or mulch after dark
- Mid sign: Millipedes can nibble tender stems or leaves near soil line
- Later sign: These pests rarely cause classic leaf stippling or sticky residue
What it looks like, where it hides, and what damage it causes
What it looks like
Look for repeated visible pest markers plus fresh activity over time.
Where it hides
Inspect protected growth points, undersides, and node creases.
What damage it causes
Damage usually expands in clusters when active stages are not interrupted.
Symptoms to check first
Start with what you can clearly see right now before changing treatment or care variables.
Nighttime crawler activity
You see many-legged pests around pots, trays, or mulch after dark.
Ragged seedling damage
Millipedes can nibble tender stems or leaves near soil line.
Minimal leaf-only patterns
These pests rarely cause classic leaf stippling or sticky residue.
Outbreaks after weather swings
Counts often spike after heavy rain or sudden dry periods.
Where to check on the plant
Inspect these locations before locking your diagnosis.
Under pots, trays, and boards
These damp, dark shelters are common daytime hiding spots.
Soil line and plant crowns
This is where millipede nibbling is most likely on seedlings.
Mulch and leaf litter zones
Organic debris supports population buildup and shelter.
Night checks with flashlight
Nocturnal activity makes diagnosis easier than daytime checks.
What this gets confused with
Use this quick contrast to reduce misdiagnosis before treatment.
Slugs
Slugs leave slime trails; millipedes and centipedes do not.
Damping-off disease
Disease causes collapse without visible many-legged crawlers feeding.
Wireworms
Wireworms have far fewer legs and mostly attack roots underground.
Why this happens
Choose the closest driver first, then run one correction at a time.
Damp habitat buildup
What it looks like: Mulch, litter, and wet debris collect around plant bases.
Why it happens: These conditions provide shelter and food for crawler populations.
First correction: Isolate, clean visible activity, and begin repeat treatment cadence.
Chronic surface moisture
What it looks like: Pot areas stay wet and cool for long periods.
Why it happens: Many-legged crawlers survive and gather better in moist zones.
First correction: Isolate, clean visible activity, and begin repeat treatment cadence.
Weather-driven migration
What it looks like: Numbers surge after rain or abrupt dry spells.
Why it happens: Environmental shifts push crawlers into new shelter and food areas.
First correction: Isolate, clean visible activity, and begin repeat treatment cadence.
Seedling vulnerability
What it looks like: Damage is mostly on tender young plants.
Why it happens: Soft tissue is easier for millipedes to chew than mature foliage.
First correction: Isolate, clean visible activity, and begin repeat treatment cadence.
How to confirm it
Before you treat, run these checks to confirm you are targeting the right problem.
-
Night flashlight check
You should see active crawlers around soil and shelter spots.
-
Body-shape check
Rounder/slower usually means millipede; flatter/faster usually means centipede.
-
Shelter trap check
Moist cardboard or board traps gather crawlers overnight.
-
Post-cleanup trend
Counts should drop after moisture and debris correction.
Treatment cadence and repeat intervals
- Interval: Every 5 to 7 days
- Rounds: 3 cycles minimum
- Recheck window: Recheck every 48 to 72 hours
- Stop rule: Stop only after no new signs across repeat checks.
Signs it is improving vs signs it is getting worse
Improving signs
- Fewer fresh signs appear between checks.
- Damage progression slows on new growth.
Worsening signs
- Fresh hotspots appear on new tissue.
- Nearby plants start showing the same pattern.
How to fix it
Follow the sequence without skipping repeat cycles.
Dry and clean the zone
Cut back overwatering and remove wet litter, mulch clumps, and debris near crowns and pots.
Remove shelter points
Lift and clean under trays, boards, and dense cover where crawlers hide during the day.
Manual nighttime removal
Collect visible crawlers at dusk or dawn when they are active and easiest to find.
Set basic traps
Use damp cardboard or boards overnight, then discard trapped pests each morning.
Protect sensitive seedlings
Use cleaner, drier seedling zones and avoid heavy mulch touching stems.
Track weekly counts
Keep a simple count log to ensure activity declines week over week.
⚠ Escalate quickly if you notice:
- Fresh seedling chew damage continues after cleanup.
- Crawler counts remain high at night for more than a week.
- Damage spreads to multiple pots or beds.
- Soil remains persistently wet despite watering changes.
How to prevent it
Use these habits to reduce reinfestation risk and catch activity early.
-
Weekly habitat cleanup
Less shelter means fewer crawler hotspots.
-
Moisture discipline
Drier surfaces reduce survival and migration pressure.
-
Night spot checks
Nocturnal behavior makes early detection easier.
-
Seedling protection
Young plants are the most likely to show chewing.
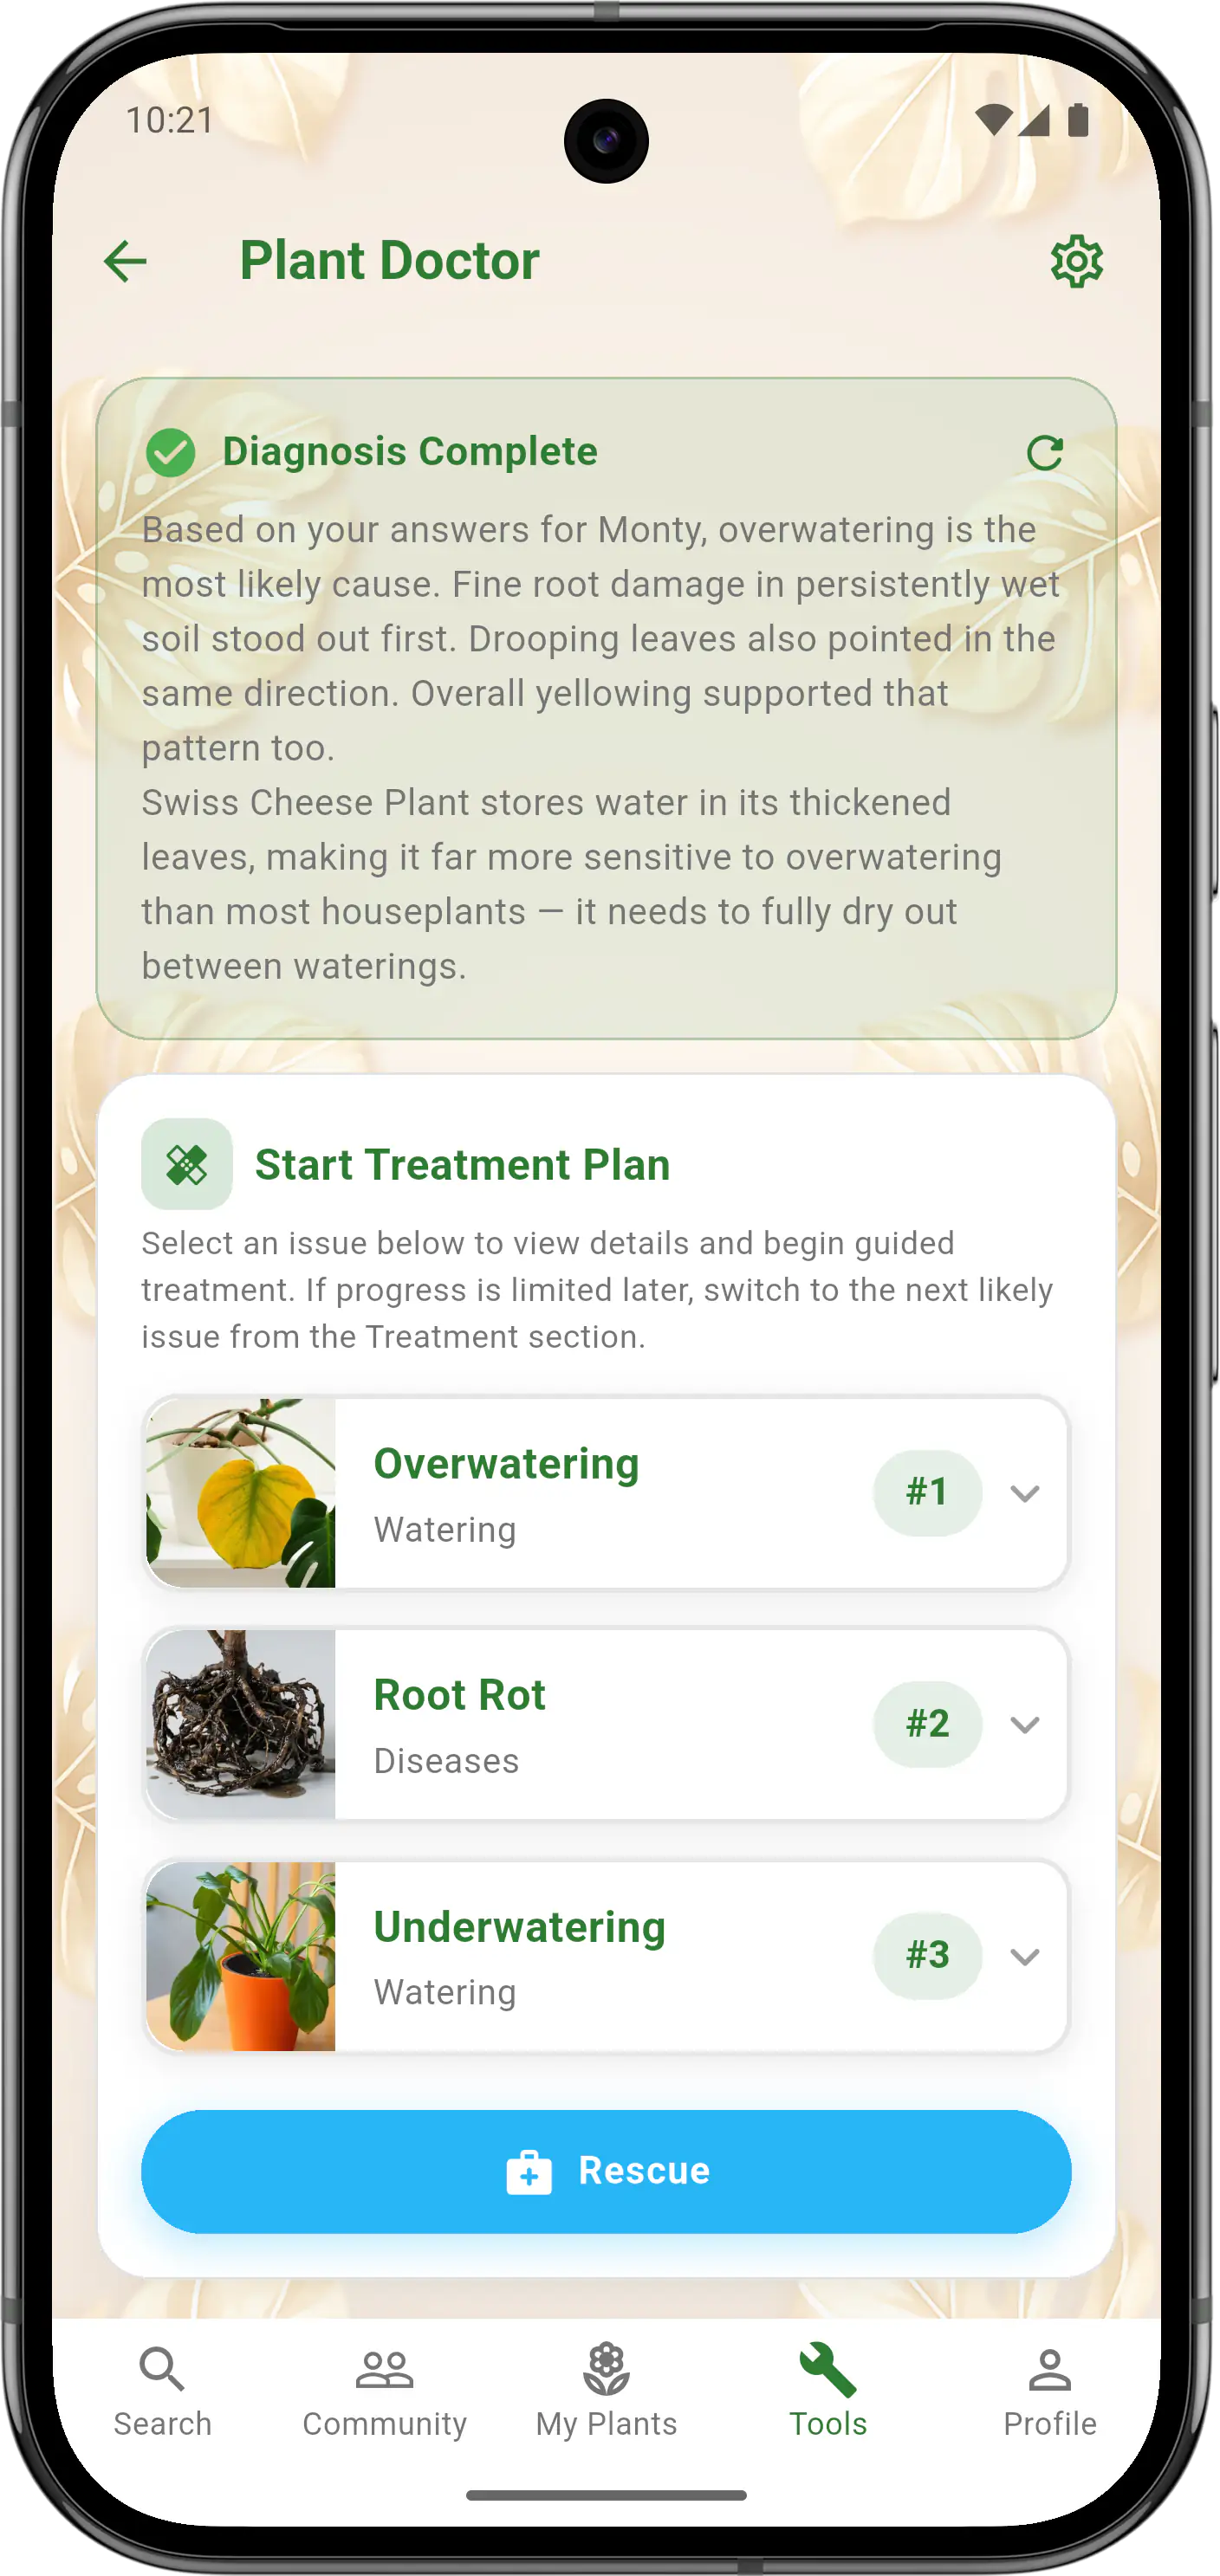
Plant Doctor
Many-legged crawlers keep returning in soil?
Plant Doctor helps separate millipede and centipede patterns so you can focus on practical moisture and habitat fixes.
Pattern clarity
Helps you spot patterns you might miss when symptoms overlap.
Cause separation
Uses recent care history and symptom changes to narrow likely causes.
Guided next steps
Supports observation over time so fixes stay consistent and practical.
Frequently Asked Questions
Keep the first pass simple so you can separate likely causes from noise. For worm like, prioritize the most direct confirmation step first. Compare symptom timing with your last watering and placement change before doing anything else. Track results for 7 to 14 days so you can confirm what improved.
Use a quick diagnosis pass first so your next step matches the actual issue. For millipedes centipedes, avoid broad resets and test one correction at a time. A simple light check and moisture-depth check usually rules out the biggest mistakes quickly. Document what changed this week so future decisions stay clear.
Start with one direct check before changing care routines. Focus on one measurable check before adding another intervention. Check light level, soil moisture depth, and root condition before making changes. Keep a short log so you can stop repeating low-value changes.
Keep the first pass simple so you can separate likely causes from noise. With stop them, document one clear signal before changing routines. Compare symptom timing with your last watering and placement change before doing anything else. Make one small adjustment at a time to avoid overcorrecting.
Control Plant Pests With More Confidence
Use Plant Doctor to identify likely pests and follow practical treatment steps that are easier to stick with.
- Identify likely pests faster
- Follow repeatable treatment steps
- Reduce reinfestation risk