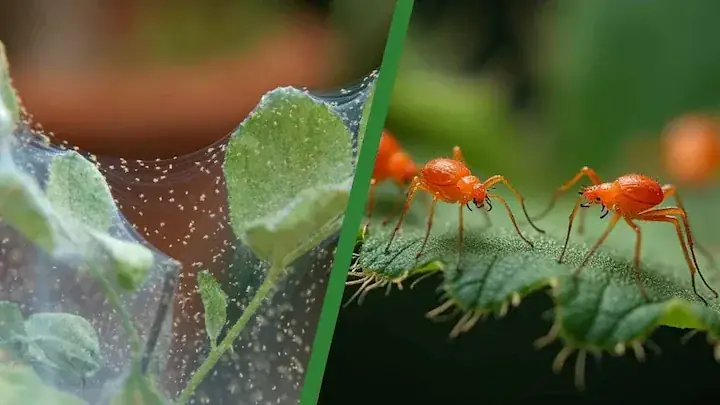
Why is there webbing on my plant? In most homes, it is usually a spider mite problem. Tiny pale speckles often show up first, and visible webbing usually means you are not at the very beginning anymore. It can be controlled, but beginners usually succeed only when they treat thoroughly and repeat on schedule.
Why Is There Webbing on My Plant? Spider Mites, Signs, and Fixes

Quick Diagnosis
Webbing on my plant: quick diagnosis
Short answer
Webbing is usually a later spider mite clue, while tiny stippling is often the early clue beginners miss. First step: Check leaf undersides in bright light and do a white-paper tap test before choosing treatment.
Most likely causes
- Warm, dry rooms speed the cycle: damage often worsens fast near heaters, vents, or hot windows
- Underside colonies are easy to miss: the top of the plant looks stressed before pests are clearly seen
- Spread happens between nearby plants: a second plant starts stippling soon after the first one
- Treatment stops too early: the plant looks cleaner, then symptoms come back within days
What to do first
- Step 1: Isolate and reduce pressure: Move the plant away from others immediately and inspect nearby plants the same day. Prune only badly damaged leaves so treatment can focus on active foliage
- Step 2: Rinse and break webbing: Rinse upper and lower leaf surfaces every 2 to 3 days for 1 to 2 weeks. This knocks down mites and eggs and clears webbing that blocks spray contact
- Step 3: Spray for full contact: Apply insecticidal soap or horticultural oil to full coverage on both leaf sides, especially undersides and joints. Many labels use about 2 to 5 tbsp soap per gallon or around 0.5 to 1% oil
- Step 4: Repeat before they rebound: Repeat every 7 to 10 days for at least 2 to 3 rounds. One cleaner-looking pass is not enough because eggs can hatch after the first round
What not to do yet
- Do not spray before checking hidden leaf undersides, stems, and soil-line areas
- Do not stop after one cleanup if eggs or hidden stages may still be present
- Do not treat nearby plants blindly, but inspect them before pests spread
Quick answer
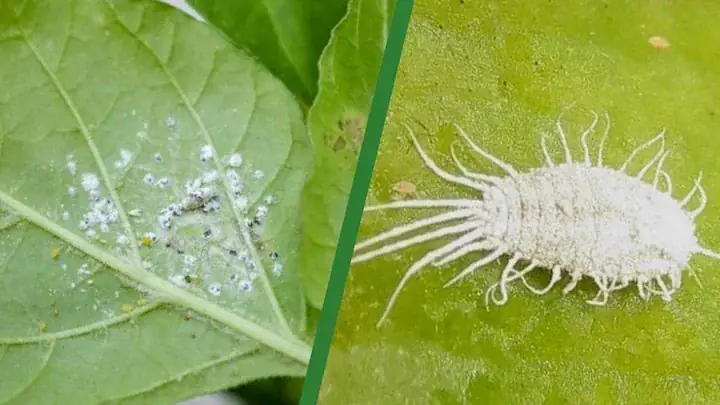
Quick answer: Spider mites. Fine webbing with tiny pale stippling almost always points to spider mites, especially in warm, dry indoor air.
- Early sign: tiny pale dots, usually first on leaf undersides
- Mid sign: leaves start looking faded, dusty, or bronze
- Later sign: visible webbing between leaves, stems, or leaf joints
What it looks like, where it hides, and what damage it causes
What it looks like
Look for repeated visible pest markers plus fresh activity over time.
Where it hides
Inspect protected growth points, undersides, and node creases.
What damage it causes
Damage usually expands in clusters when active stages are not interrupted.
Symptoms to check first
Start with what you can clearly see right now before changing treatment or care variables.
Tiny pale speckles (early)
These small dots are often the first clue. They usually appear before webbing and are easy to mistake for normal stress.
Dull, dusty, or bronze color
As feeding continues, leaves lose their healthy green tone and start looking tired or dirty.
Fine webbing (later)
Visible webbing usually means the infestation has already built up, not that it just started.
Leaf drop and weak new growth
Heavy pressure can cause early leaf drop. A recovering plant may still keep old damage while new growth improves.
Where to check on the plant
Inspect these locations before locking your diagnosis.
Leaf undersides along veins and midrib
Mites and eggs usually collect here first, so top-only checks often miss the real hotspot.
Leaf joints, stem corners, and branch forks
Webbing and dust pockets build in protected joints where colonies can hide.
Older outer leaves first
You may spot early stippling on older leaves before obvious damage reaches new growth.
Plants near heaters, vents, and hot windows
Warm dry zones speed reproduction, so these plants often show the earliest surge.
What this gets confused with
Use this quick contrast to reduce misdiagnosis before treatment.
Drought or nutrient stress
General stress often looks more uniform. Spider mites usually show many tiny speckles plus underside activity.
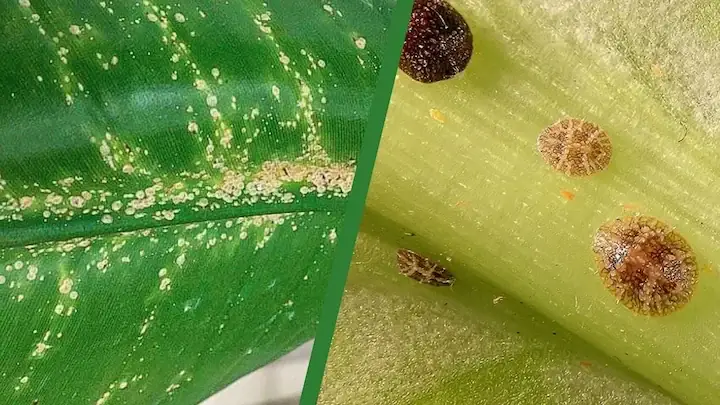
Thrips damage
Thrips usually leave silver streaking and black specks. Spider mites leave dense stippling and fine webbing.
Powdery mildew or dust
Mildew and dust sit like a coating. Spider mite evidence includes moving specks, eggs, and webbing pockets.
Why this happens
Choose the closest driver first, then run one correction at a time.
Warm, dry rooms speed the cycle
What it looks like: Damage often worsens fast near heaters, vents, or hot windows.
Why it happens: Spider mites reproduce quickly in dry warmth, so small colonies can surge in about 7 to 10 days.
First correction: Isolate, clean visible activity, and begin repeat treatment cadence.
Underside colonies are easy to miss
What it looks like: The top of the plant looks stressed before pests are clearly seen.
Why it happens: Mites hide under leaves first, so quick top-only checks delay targeted treatment.
First correction: Isolate, clean visible activity, and begin repeat treatment cadence.
Spread happens between nearby plants
What it looks like: A second plant starts stippling soon after the first one.
Why it happens: Mites move on touching foliage and can hitchhike during routine handling and cleanup.
First correction: Isolate, clean visible activity, and begin repeat treatment cadence.
Treatment stops too early
What it looks like: The plant looks cleaner, then symptoms come back within days.
Why it happens: Eggs and hidden stages survive single rounds, so repeat treatment is needed to break the lifecycle.
First correction: Isolate, clean visible activity, and begin repeat treatment cadence.
How to confirm it
Before you treat, run these checks to confirm you are targeting the right problem.
-
Tap test on white paper
Tap a leaf over white paper or a tray. If tiny specks fall and crawl, that confirms live mites. Around 5 to 10 moving specks is enough to treat now.
-
Bright-light underside check
Look along veins and midrib for moving dots, tiny round eggs, and empty skins. This confirms active breeding zones.
-
Pattern pairing check
Stippling plus webbing gives much stronger confidence than either clue alone. Sticky traps do not confirm mites because mites do not fly.
-
3-day follow-up check
If fresh stippling appears within 3 days, coverage or repeat timing is incomplete and the cycle is still active.
Treatment cadence and repeat intervals
- Interval: Every 5 to 7 days
- Rounds: 3 cycles minimum
- Recheck window: Recheck every 48 to 72 hours
- Stop rule: Stop only after no new signs across repeat checks.
Signs it is improving vs signs it is getting worse
Improving signs
- Fewer fresh signs appear between checks.
- Damage progression slows on new growth.
Worsening signs
- Fresh hotspots appear on new tissue.
- Nearby plants start showing the same pattern.
How to fix it
Follow the sequence without skipping repeat cycles.
Step 1: Isolate and reduce pressure
Move the plant away from others immediately and inspect nearby plants the same day. Prune only badly damaged leaves so treatment can focus on active foliage.
Step 2: Rinse and break webbing
Rinse upper and lower leaf surfaces every 2 to 3 days for 1 to 2 weeks. This knocks down mites and eggs and clears webbing that blocks spray contact.
Step 3: Spray for full contact
Apply insecticidal soap or horticultural oil to full coverage on both leaf sides, especially undersides and joints. Many labels use about 2 to 5 tbsp soap per gallon or around 0.5 to 1% oil.
Step 4: Repeat before they rebound
Repeat every 7 to 10 days for at least 2 to 3 rounds. One cleaner-looking pass is not enough because eggs can hatch after the first round.
Step 5: Adjust conditions and watch recovery
Keep humidity around 50 to 60% when practical and reduce hot, dry airflow. Expect old damage to stay, and judge progress by cleaner new growth over the next weeks.
Step 6: Avoid mistakes and escalate carefully
Do not stop after one treatment, do not spray in harsh sun or extreme heat, and do not use dish soap mixes. If mites are still active after full repeat cycles, use a labeled miticide for houseplants and follow rotation guidance.
⚠ Escalate quickly if you notice:
- Fresh webbing or moving specks return within a few days.
- Nearby plants start showing new stippling during treatment.
- Bronzing keeps expanding after two full repeat rounds.
- Leaf drop continues and no clean new growth appears.
How to prevent it
Use these habits to reduce reinfestation risk and catch activity early.
-
Do a weekly tap test
It catches active mites before webbing gets heavy and treatment gets harder.
-
Quarantine every new plant
A 1 to 2 week isolation check prevents one hidden plant from infecting your setup.
-
Keep leaves clean and spacing open
You can spot early symptoms faster and slow plant-to-plant transfer.
-
Respond to early speckling
Early treatment usually means less leaf loss and fewer repeat rounds.
Plant Doctor
Need help confirming spider mites versus other tiny pests?
Plant Doctor helps compare webbing, stippling, and spread pattern so your next step stays focused and practical.
Pattern clarity
Helps you spot patterns you might miss when symptoms overlap.
Cause separation
Uses recent care history and symptom changes to narrow likely causes.
Guided next steps
Supports observation over time so fixes stay consistent and practical.
Frequently Asked Questions
Fine webbing on leaves and stems is usually from spider mites. You will often see tiny pale speckles first, then webbing as the mite population grows.
Most of the time, yes, especially when webbing appears with pale stippling. Dust can look web-like, but dust does not crawl, spread, or keep creating new speckling.
Spider mites can build up quickly in warm, dry rooms, often within about 7 to 10 days. That is why one late response can turn a small issue into a multi-plant outbreak.
Isolate the plant right away, then rinse leaf undersides thoroughly. Start a repeat treatment cycle after rinsing, because one clean-looking pass is rarely enough.
Control Plant Pests With More Confidence
Use Plant Doctor to identify likely pests and follow practical treatment steps that are easier to stick with.
- Identify likely pests faster
- Follow repeatable treatment steps
- Reduce reinfestation risk