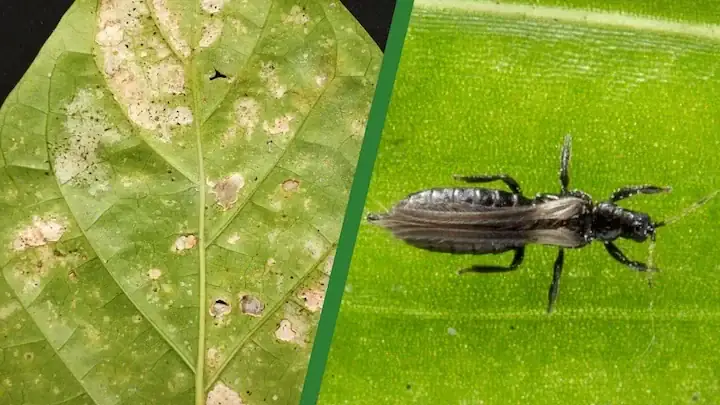
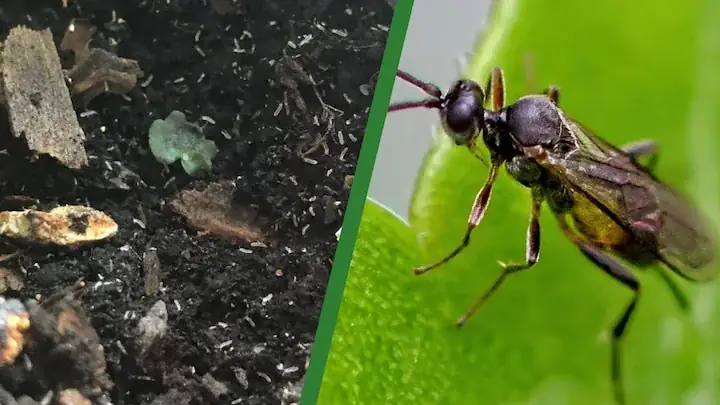
Why are there tiny black bugs on my plant is often a thrips problem. They scrape leaf tissue, leaving silver streaks and tiny black droppings. They can spread quickly, but a repeat treatment plan works when coverage is consistent.
Why Are There Tiny Black Bugs on My Plant? Thrips Signs and Fixes

Quick Diagnosis
Why are there tiny black bugs on my plant: quick diagnosis
Short answer
Thrips are usually identified by silver scarring plus tiny black droppings. First step: Look for silver streaks and black specks, then confirm with a tap test over white paper.
Most likely causes
- Rasping-sucking feeding: leaves develop silver scars and rough patches
- Short life cycle: counts rebound quickly after one treatment
- Dry, warm air: outbreaks worsen in hot, dry periods
- Missed repeat rounds: damage resumes after initial improvement
What to do first
- Isolate quickly: Move the plant away from others because adults can spread across nearby foliage
- Rinse and prune: Rinse undersides and buds, then remove badly scarred leaves to reduce active numbers
- Spray complete coverage: Use insecticidal soap, horticultural oil, or a labeled thrips product like spinosad. Coat both sides, buds, and creases
- Repeat every 5 to 7 days: Do at least 3 rounds so newly emerged stages are treated. One round is rarely enough
What not to do yet
- Do not spray before checking hidden leaf undersides, stems, and soil-line areas
- Do not stop after one cleanup if eggs or hidden stages may still be present
- Do not treat nearby plants blindly, but inspect them before pests spread
Quick answer
Quick answer: Thrips. Silver streaks plus black specks are stronger clues than bug color alone.
- Early sign: Often the earliest clue. Leaves look scuffed or metallic when tilted in light
- Mid sign: These droppings often sit on or near silver damage zones
- Later sign: New leaves and buds may emerge twisted, curled, or scarred
What it looks like, where it hides, and what damage it causes
What it looks like
Look for repeated visible pest markers plus fresh activity over time.
Where it hides
Inspect protected growth points, undersides, and node creases.
What damage it causes
Damage usually expands in clusters when active stages are not interrupted.
Symptoms to check first
Start with what you can clearly see right now before changing treatment or care variables.
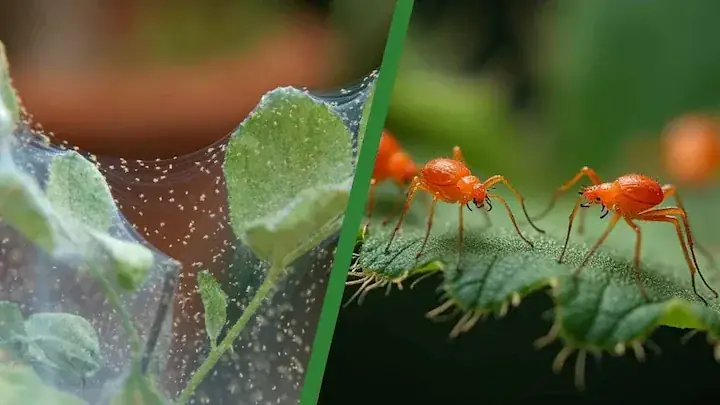
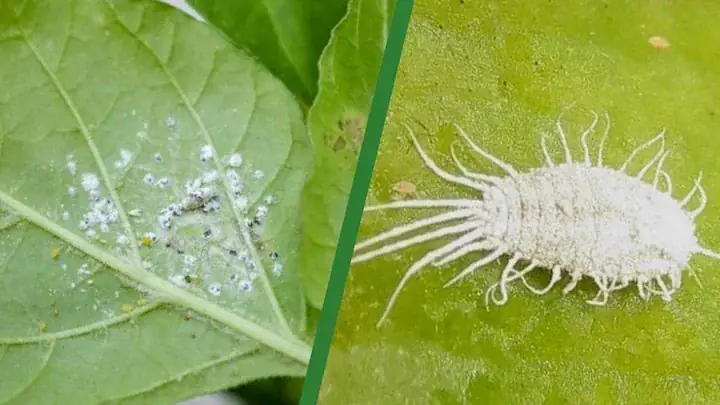
Silvery streaks or patches
Often the earliest clue. Leaves look scuffed or metallic when tilted in light.
Tiny black specks
These droppings often sit on or near silver damage zones.
Distorted new growth
New leaves and buds may emerge twisted, curled, or scarred.
Bronzing over time
Untreated damage can spread from silver flecks into brown, dry scars.
Where to check on the plant
Inspect these locations before locking your diagnosis.
Undersides of young leaves
Thrips often feed and hide on tender tissue there.
Flower buds and petals
Many thrips species congregate in buds and flowers.
Leaf-stem joints and creases
Sheltered spots protect them during routine checks.
Topsoil near the plant
Some life stages pupate in media, helping infestations rebound.
What this gets confused with
Use this quick contrast to reduce misdiagnosis before treatment.
Spider mites
Mites usually cause fine stippling and webbing, not black frass dots and silver streaking.
Nutrient stress
Nutrient issues do not produce moving insects or black droppings.
Sunburn
Sunburn is broader and static, while thrips damage keeps appearing on new growth.
Why this happens
Choose the closest driver first, then run one correction at a time.
Rasping-sucking feeding
What it looks like: Leaves develop silver scars and rough patches.
Why it happens: Thrips scrape cell surfaces and suck contents, leaving reflective damage.
First correction: Isolate, clean visible activity, and begin repeat treatment cadence.
Short life cycle
What it looks like: Counts rebound quickly after one treatment.
Why it happens: New stages appear within days in warm indoor conditions.
First correction: Isolate, clean visible activity, and begin repeat treatment cadence.
Dry, warm air
What it looks like: Outbreaks worsen in hot, dry periods.
Why it happens: These conditions speed reproduction and reduce natural suppression.
First correction: Isolate, clean visible activity, and begin repeat treatment cadence.
Missed repeat rounds
What it looks like: Damage resumes after initial improvement.
Why it happens: Eggs and soil stages survive if treatments stop too early.
First correction: Isolate, clean visible activity, and begin repeat treatment cadence.
How to confirm it
Before you treat, run these checks to confirm you are targeting the right problem.
-
Tap test on white paper
Thin, fast-moving insects drop out and move quickly.
-
Frass check
Black dots near silver damage strongly support thrips.
-
Sticky trap check
Cards can catch adults and help track whether pressure is falling.
-
Recheck in 3 to 4 days
Fresh silver marks suggest hatch stages are still active.
Treatment cadence and repeat intervals
- Interval: Every 5 to 7 days
- Rounds: 3 cycles minimum
- Recheck window: Recheck every 48 to 72 hours
- Stop rule: Stop only after no new signs across repeat checks.
Signs it is improving vs signs it is getting worse
Improving signs
- Fewer fresh signs appear between checks.
- Damage progression slows on new growth.
Worsening signs
- Fresh hotspots appear on new tissue.
- Nearby plants start showing the same pattern.
How to fix it
Follow the sequence without skipping repeat cycles.
Isolate quickly
Move the plant away from others because adults can spread across nearby foliage.
Rinse and prune
Rinse undersides and buds, then remove badly scarred leaves to reduce active numbers.
Spray complete coverage
Use insecticidal soap, horticultural oil, or a labeled thrips product like spinosad. Coat both sides, buds, and creases.
Repeat every 5 to 7 days
Do at least 3 rounds so newly emerged stages are treated. One round is rarely enough.
Manage soil stage
Refresh topsoil if needed and avoid constantly wet media where pupae can persist.
Track trend weekly
Use sticky cards and leaf checks to verify less fresh damage each week.
⚠ Escalate quickly if you notice:
- Silver damage keeps appearing on new leaves after treatment.
- Black frass dots remain common across multiple plants.
- Bud drop or distorted growth continues.
- Sticky trap catches are flat or increasing.
How to prevent it
Use these habits to reduce reinfestation risk and catch activity early.
-
Weekly underside scans
Early thrips signs are easiest to see on young leaves.
-
Sticky-card monitoring
Trap trends catch rising pressure before heavy damage.
-
New-plant quarantine
Hidden eggs and larvae often arrive on new stock.
-
Early treatment cycles
Small infestations are much easier to clear.
Plant Doctor
Tiny black bugs and silver streaks getting worse?
Plant Doctor helps confirm thrips versus lookalikes and builds a repeat schedule so treatment is harder to misuse.
Pattern clarity
Helps you spot patterns you might miss when symptoms overlap.
Cause separation
Uses recent care history and symptom changes to narrow likely causes.
Guided next steps
Supports observation over time so fixes stay consistent and practical.
Frequently Asked Questions
Keep the first pass simple so you can separate likely causes from noise. For tiny black, prioritize the most direct confirmation step first. Compare symptom timing with your last watering and placement change before doing anything else. Track results for 7 to 14 days so you can confirm what improved.
Use a quick diagnosis pass first so your next step matches the actual issue. For confirm thrips, avoid broad resets and test one correction at a time. A simple light check and moisture-depth check usually rules out the biggest mistakes quickly. Document what changed this week so future decisions stay clear.
Use a baseline check first so fixes are based on evidence, not guesses. For treatment, prioritize the most direct confirmation step first. Confirm whether the issue is worsening, stable, or improving before stacking new treatments. Track results for 7 to 14 days so you can confirm what improved.
Treat this as a process: observe first, then adjust one variable. For thrips spraying, avoid broad resets and test one correction at a time. If signs are mixed, prioritize root health and placement before adding fertilizer or extra watering. Document what changed this week so future decisions stay clear.
Control Plant Pests With More Confidence
Use Plant Doctor to identify likely pests and follow practical treatment steps that are easier to stick with.
- Identify likely pests faster
- Follow repeatable treatment steps
- Reduce reinfestation risk